Let’s talk about kitchen cupboards.
Not the wide, perfectly symmetrical, soft-close cabinetry you see in German kitchen showrooms. I mean the real ones.
The corner cupboard that requires a full-body yoga stretch just to reach the back. The narrow vertical cabinet next to the oven that seems too slim to be useful for anything except a single baking tray. The cupboard above the fridge that might as well be in another postcode.
Kitchen cupboards are deceptive. On paper, they look like generous storage. In reality, they often become dark, awkward voids where items go to be forgotten.
- You push a jar to the back because you can’t reach it.
- You stack tins on top of each other because the shelf is too high.
- You forget what you own, rebuy it, and then wonder why your cupboards feel permanently full.
The issue isn’t capacity. It’s Geometry. Most cupboards are deep rectangles (60cm deep). Most kitchen items are small cylinders (tins, jars) or awkward shapes (blenders). When you combine depth with poor visibility, you create what I call the “Black Hole Effect.”
Good kitchen cupboard storage ideas aren’t about cramming more in. They’re about making everything reachable, visible, and logically grouped. Here is how to fix awkward cupboards without ripping your kitchen out.
If you’re working with a compact layout, these small kitchen storage ideas help you rethink the entire space, not just the cabinets.
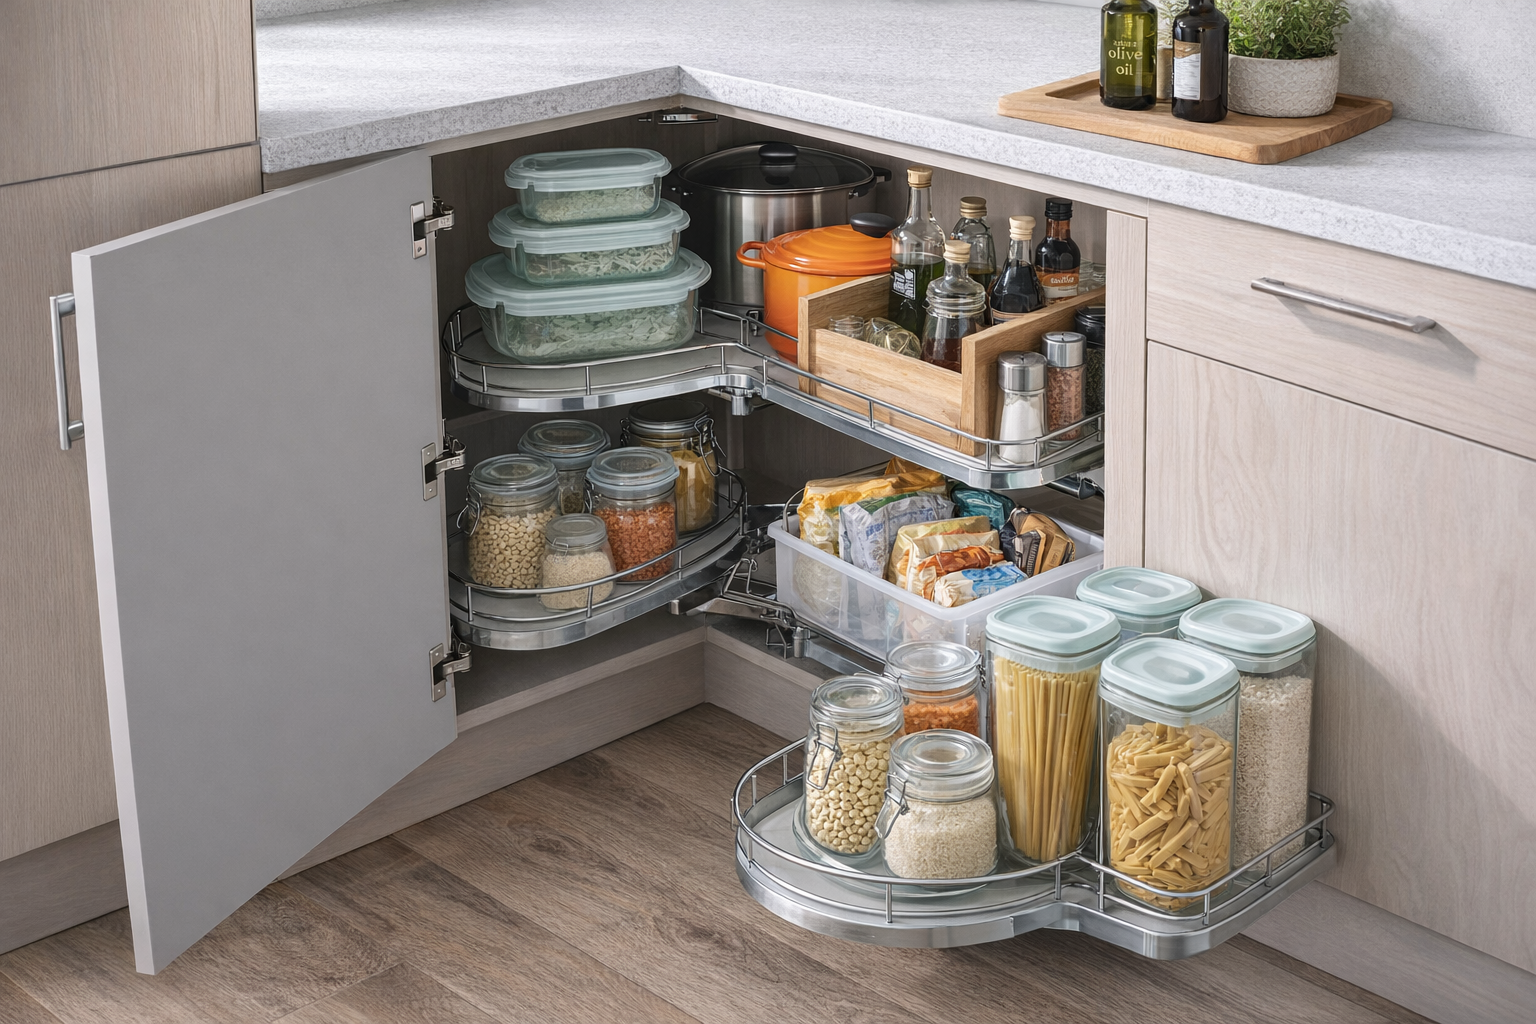
1. The Corner Cupboard (The “Blind Spot”)
Corner cupboards are the most misunderstood storage in the kitchen. You open the door, see a vast cavern, and think: “So much space!” Then you try to retrieve the blender from the back and nearly dislocate your shoulder.
The Physics: A standard blind corner cabinet has a 50% “dead zone” that is hidden behind the adjacent cabinet. It is dark and physically hard to access.
The Fixes:
- Lazy Susans (Turntables): A rotating tray instantly converts dead back space into accessible storage. It brings the back to the front. Perfect for oils, vinegars, and spices.
- The “Magic Corner” (Hardware Upgrade): If you are handy with a drill, install a pull-out mechanism (often called a “LeMans” or “Magic Corner”). These kidney-shaped shelves swing completely out of the cabinet, bringing 100% of the contents into the light.
- Rental Hack: If you can’t install hardware, use large rectangular bins with handles. Think of them like “train carriages.” To get to the back bin, you pull out the front bin.
2. The Depth Dilemma (Drawer-ify Your Cupboard)
Most base cupboards are 60cm deep. Very few food items are 60cm deep. That means the back 30cm of your cupboard is a graveyard. If your drawers are just as chaotic as your cupboards, our guide to kitchen drawer organisation ideas shows you how to stop sliding, stacking and daily digging.
The Fix: Treat the Cupboard Like a Drawer.
- Pull-Out Bins: Place items into long, deep plastic bins (like fridge organizers). When you need something, pull the entire bin out onto the counter.
- Tiered Risers (The Stadium Effect): Especially useful for tins. Instead of stacking cans flat (where the bottom one is hidden), use stepped risers. You can see every label at a glance.
- Clear vs. Opaque: In kitchens, Clear Bins work better. You need quick visual confirmation of stock levels (“Do I have pasta?”). Opaque bins hide the mess, but also hide the food.
3. The “Air Gap” (Adjust Your Shelves)
Open your cupboard. Look at the tins of beans. They are 10cm tall. The shelf above them is probably 30cm high. That means 20cm of vertical space is just air.
The Science: Most kitchen cabinets use the “32mm System” (rows of holes down the side).
- Action: Move your shelves! You don’t have to keep them where the installer put them. Lower the shelf so it sits just above the tins. You might gain enough space for a whole new shelf.
- Shelf Risers: If you can’t move the shelf, insert a wire “shelf riser.” This doubles your surface area without any drilling.
- Under-Shelf Baskets: These wire baskets clip onto the shelf above and hang down. They utilize that “dead air” perfectly for light items like wraps, sandwich bags, or napkins.
4. The Narrow Cabinet (15cm of Gold)
That slim 15–20cm cabinet next to the oven? Most people shove baking trays in there and forget them. This is wasted potential.
Vertical Storage is King here.
- Baking Trays: Do not stack them flat. Store them upright (like files in a library). Use a tension rod or a vertical divider to keep them standing. You can grab one without unstacking the whole pile.
- Chopping Boards: Same rule. Vertical only.
- Pull-Out Spice Rack: If you are feeling ambitious, you can buy slim sliding mechanisms that turn this gap into a spice rack.
For pipe-heavy cabinets, these under sink storage ideas without drilling offer renter-safe solutions.
5. The “Power Zone” (Ergonomics of Heavy Lifting)
Small kitchens often dedicate an entire cupboard to bulky appliances: Air Fryer, Slow Cooker, Stand Mixer. The Ergonomic Rule: Heavy items must live in the “Power Zone” (between your knees and your shoulders).
- Never High: Lifting a heavy mixer from above your head is dangerous.
- Never Low Back: Lifting a heavy pot from the back of a bottom shelf strains your lower back.
The Slide-Out Mat: If you must store a heavy appliance low down, place it on a felt slider or a plastic placemat. This reduces friction, allowing you to slide the heavy item forward easily rather than dragging it.
6. Door Storage (The “Lightweight” Only Rule)
Cupboard doors are valuable real estate, but they are fragile. Kitchen hinges are designed to hold the weight of the door, not 5kg of glass jars.
Use door-mounted racks strictly for:
- Packets of seasoning.
- Cleaning cloths / sponges.
- Box of aluminium foil.
- Lightweight lids.
Avoid: Heavy glass jars, bottles of oil, or chopping boards. If the door starts to sag or won’t close flush, you have overloaded it.
7. Zone by Task, Not Type
Grouping by “All Tins Together” isn’t always optimal. It creates friction. Why walk across the kitchen to get oil for the frying pan?
Re-Zone by Activity:
- The “Cooking” Cupboard (Next to Hob): Oils, vinegars, salt, pepper, spices, spatulas.
- The “Baking” Cupboard: Flour, sugar, scales, mixing bowls.
- The “Breakfast” Cupboard (Above Kettle): Tea, coffee, mugs, cereal bowls.
When cupboards match how you actually move around the kitchen, the mess reduces naturally because putting things away is easier.
8. Label the Invisible
Deep cupboards drift into chaos because people (partners, kids) guess where things belong. “I don’t know where the rice goes, so I’ll put it here.”
Structure reduces cognitive load. You don’t need fancy calligraphy labels on the jars. You need Zone Labels on the shelves.
- Put a label on the edge of the shelf saying “PASTA & RICE.”
- Put a label saying “BAKING.”
- Put a label saying “SNACKS.”
Now, everyone knows the destination. The drift stops.
9. The 80% Capacity Rule
If a cupboard is packed tight (100% capacity), it will fail. To get one thing out, you have to move two things. That is High Friction. You need “Breathing Room” to:
- Put things away easily (without shoving).
- Add new items (without rearranging the whole cupboard).
Aim for 80% Full. Leave a gap. Leave a shelf empty. That empty space is not wasted; it is the “buffer” that keeps the system stable.
Final Thoughts
Awkward kitchen cupboards aren’t the enemy. Invisible storage is.
When you bring the back forward (bins), create layers intentionally (risers), and store by usage (zones), even the most frustrating cupboard becomes functional. Start with the worst one—probably the corner cupboard. Pull everything out. Add one turntable. You will be amazed at how much space you find.
4 thoughts on “Kitchen Cupboard Storage Ideas for Awkward Spaces That Usually Become Black Holes”
Comments are closed.