Let’s talk about the most infuriating part of almost every kitchen: The Corner.
You know the one I mean. It is deep. It is dark. It is a geometric anomaly that manages to be massive and completely useless at the same time.
You open the cupboard door and stare into what feels like a cave system. Somewhere at the back, hidden in the shadows, is a pot lid you haven’t seen in six months. Next to it is a jar of pickled walnuts you bought for a Christmas recipe in 2021 and never touched again. In the front, there is a pile of Tupperware that falls out if you breathe on it.
Everything is technically “stored,” but nothing is accessible.
Corner cupboards are where good intentions go to die. They are the Bermuda Triangle of the kitchen.
Most kitchens lose a shocking amount of usable space here, especially in homes already struggling with small kitchen storage ideas. It’s not because the cupboard is small—in fact, corner cabinets usually have the most cubic footage of any unit in the room. The problem is that they are badly designed for how human beings actually move. We are not built to crawl halfway into a wooden box on our hands and knees, holding a flashlight in our teeth, just to retrieve a frying pan.
The good news is this: corner storage problems are fixable. You don’t need to remodel your kitchen or rip out your cabinets. You just need to stop treating the corner like a normal shelf and start working with its shape instead of against it.
Here are the best corner kitchen storage ideas that actually make those awkward spaces usable—without turning your kitchen into a hardware store experiment.
1. The Core Philosophy: Corners Need Movement
The biggest mistake people make is trying to use a corner cupboard like a standard flat cupboard.
Static shelves do not work in corners. Full stop.
If you have a fixed shelf in a deep corner, the back half of that shelf is “dead zones.” You cannot see it. You cannot reach it without taking every single item in the front out first. And let’s be honest: you aren’t going to do that. You are going to grab the pan at the front and ignore the rest.
The mental shift you need to make is simple: Corners must rotate, slide, or pull out.
If the storage doesn’t move, the system will fail. Once you accept that, the solutions become obvious.
2. The Lazy Susan (The Redemption Arc)
Lazy Susans get a bad reputation. People picture those cheap, beige plastic turntables from the 90s that wobbled uncontrollably and sent sauce bottles flying every time you spun them.
But a high-quality turntable is still the MVP (Most Valuable Player) of corner storage. Why it works: Instead of reaching into the dark recess of the cupboard, you bring the back of the cupboard to the front. One spin, and the item hidden in the shadows is suddenly right in front of you.
Where it shines:
- The “Condiment Chaos”: Tall items like oils, vinegars, soy sauce, and ketchup.
- The “Baking Zone”: Jars of flour, sugar, sprinkles, and vanilla extract.
- The “Under-Sink” Corner: Cleaning sprays and sponges.
How to do it right:
- Don’t use one giant one: If your shelf is huge, don’t try to find a massive turntable. Use two medium ones side-by-side. It’s easier to manage.
- Get a lip: Only buy turntables with a raised edge (at least 1 inch). This prevents the “centrifugal force disaster” where items fly off the back into the abyss.
- Clear is best: Clear acrylic turntables let you see labels easily.
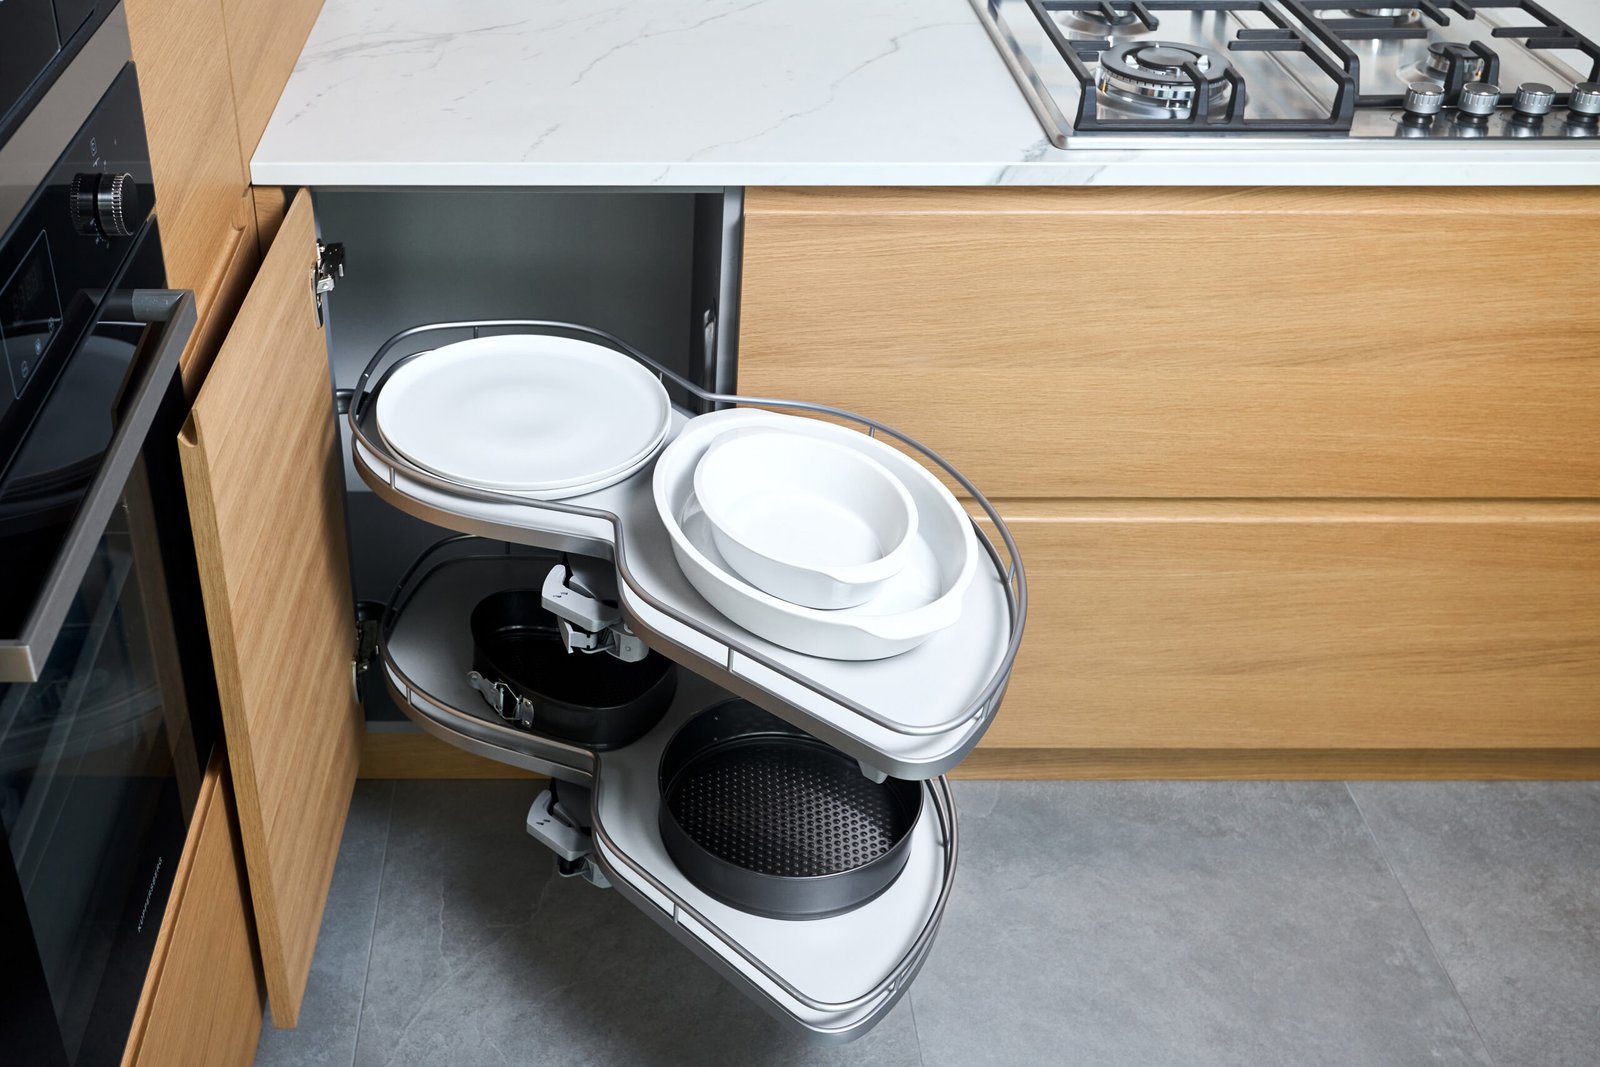
3. Pull-Out Systems (The “Magic” Hardware)
If you are renovating, or if you are handy with a screwdriver, a proper pull-out system is the single biggest upgrade you can make to a kitchen.
These are metal wire mechanisms that install inside the cabinet. When you open the door, the shelves physically slide out of the cupboard and into the room.
- The “Kidney” (LeMans) Pull-Out: These peanut-shaped shelves swing out independently. They are incredibly smooth and perfect for heavy items.
- The “Magic Corner”: This is a clever box-mechanism. When you open the door, the front shelves pull out, and the back shelves slide forward to take their place. It utilizes 100% of the space.
What to store here:
- Heavy appliances (Stand mixers, blenders, slow cookers).
- Pots and pans.
- Mixing bowls.
Yes, these systems cost more than a plastic bin (£100–£300 is common). But if you plan to live in your house for more than a year, it is an investment in your daily sanity.
4. Two-Tier Thinking (Stop the Stacking)
A common corner mistake is vertical stacking. You stack your frying pans. Then you stack the lids on top. Then you balance a colander on top of that.
Every time you want the large frying pan (which is always at the bottom), you have to dismantle the Tower of Pisa. It’s loud, annoying, and damages your non-stick coatings.
The Fix: Horizontal Separation.
- Shelf Risers: Put a wire shelf riser in the corner. Now you have two levels. Put the big pot under the riser and the small pot on top. No stacking required.
- Vertical Dividers: This is a game-changer for baking trays and chopping boards. Instead of stacking them flat, use a vertical rack (like a file organiser) to stand them up on their sides. You can grab one without triggering an avalanche.
This kind of vertical separation works throughout the kitchen, not just in corners — especially when improving cabinet kitchen storage.
5. The “Blind Corner” Hack
Some kitchens don’t have a diagonal corner cabinet. They have a “Blind Corner.” This is where one cabinet runs straight into the wall, and the other cabinet runs perpendicular to it, hiding half of the first cabinet.
You have to open a small door and reach blindly to the left or right into a dark tunnel. It is the worst design feature in history.
If you have this, you have two options:
- The “Half-Moon” Pull-Out: You can buy half-circle shelves that pivot out of the blind spot.
- The “Train” Method (Low Tech): Use rectangular plastic bins with handles. Put “Category A” (e.g., baking supplies) in a bin and push it into the blind spot. Put “Category B” (e.g., pasta) in a bin and place it in front. To get to A, you pull out B. It works like a train carriage.
Crucial Rule: Never store loose items in a blind corner. You will lose them forever. Only store large, handled bins.
6. Corner Drawers (The Dream Scenario)
This is for the renovators. If you are redesigning your kitchen, ask your cabinet maker about Corner Drawers.
Instead of a cupboard with a door, you install a bank of drawers that are V-shaped at the front. They look weird when closed (a 90-degree angle), but when you pull them, they extend deep into the corner.
- Why they are brilliant: You get full visibility. No bending, no crouching. You look down into the storage.
- What fits: They are surprisingly huge. They swallow cutlery, wisks, ladles, tea towels, and awkward utensils.
They are an underrated luxury that makes traditional corner cupboards feel prehistoric.
Cupboards often get the attention, but organising kitchen drawers properly removes daily friction where most food prep actually happens.
7. Upper Corner Cabinets (The “Deep V”)
We’ve talked about base cabinets, but wall cabinets have corners too. These are usually deep, cavernous, and hard to reach.
The mistake people make is storing heavy items here. If you have to lift a stack of ceramic dinner plates out of a deep, high corner, you are risking a breakage (or a shoulder injury).
The Strategy: Light and Large. Use upper corners for lightweight, bulky items.
- Boxes of cereal.
- Rolls of paper towels.
- The salad spinner.
- Tupperware containers.
If it falls on your head, it won’t hurt. That is the safety rule for high corners.
8. Open Shelving (Only for the Tidy)
Some people choose to take the door off the corner cabinet entirely and install open floating shelves.
The Warning: Only do this if you are a naturally tidy person. Corners are deep. If you fill open corner shelves with random clutter, half-eaten packets of crackers, and mismatched mugs, it will look like a junk shop. The same applies to organising pantry cupboards.
The Strategy: Treat it as a display zone.
- A stack of matching cookbooks.
- A large, beautiful serving bowl.
- A plant.
Use the open corner for “visual breathing room,” not for maximising storage density.
9. Zone the Corner (Give It a Job)
One reason corner cupboards fail is that they become a dumping ground for “homeless” items. A blender goes in next to the dog food, which sits next to the spare lightbulbs.
Give the corner a single, defined job.
- The “Baking Corner”: This cupboard holds the mixer, the flour, the sugar, and the rolling pin. Nothing else allowed.
- The “Tupperware Station”: This deep, annoying space is perfect for plastic containers because they are light and bulky. If they get messy, it doesn’t matter as much.
- The “Holiday Archive”: If the corner is truly impossible to reach, put your Thanksgiving/Christmas platters there. You only need to struggle with it once a year.
This same zoning logic is essential for effective pantry organisation ideas.
10. The “Do Nothing” Option (A Reality Check)
Finally, here is a radical thought: You don’t have to fill the corner.
If you have a deep, blind corner cabinet that is impossible to reach, and you don’t have the budget for fancy pull-outs… just leave the back empty.
It is better to have a cupboard that is 50% full and completely accessible, than a cupboard that is 100% full of frustration. Put your items in the front. Leave the dark, unreachable back corner as dead air.
It’s not wasted space; it’s “breathing room” for your sanity.
Final Thoughts
Corner kitchen storage isn’t about finding a magic spell that turns a triangle into a square. It’s about respecting the geometry.
Corners need specialized treatment. They need motion (turntables), mechanics (pull-outs), or strict zoning.
Start small. Buy a turntable this weekend for your oils and vinegars. Once you stop fighting the corner and start working with it, you’ll be amazed at how much usable space you’ve been ignoring this whole time.